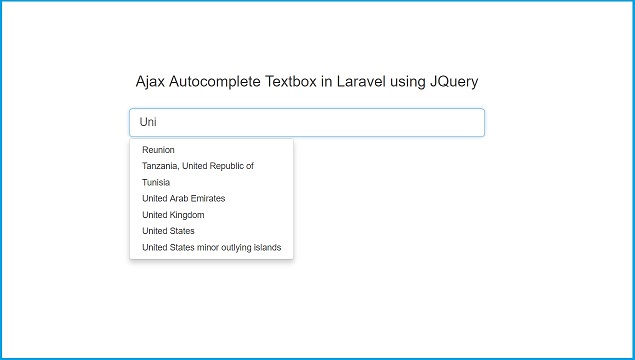
In this post we are going to learn ajax live search or make autocomplete textbox by using JQuery in Laravel Application. Here we will make simple and good example of How to create Autocomplete textbox in Ajax JQuery using Laravel. We will use ajax request for getting records from Mysql database table. In tutorial we have build autocomplete functionality in Laravel by using Ajax with Jquery and Mysql database.
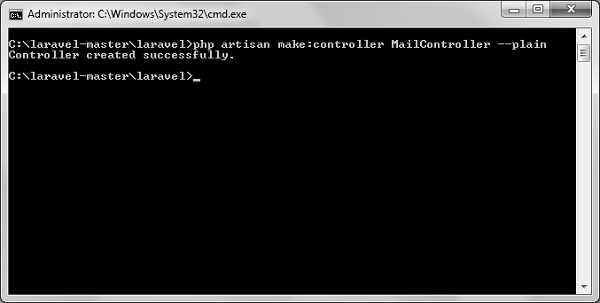
Above command will make AutocompleteController.php file in app/Http/Controllers folder. In this file we will write following code. First index() method will html output on web page and dislay textbox for enter country name. When we have enter country name then it will send request to fetch() method for search country name from mysql table.
app/Http/Controllers/AutocompleteController.php
Now we want to make view file with name autocomplete.blade.php in resources/view/ folder. This is our output file and we can see output in browser. In this file we have write html code for display textbox for enter country name and jquery code for send ajax request to Laravel Autocomplete controller fetch() method. After fetching data from server it will display list of suggested country below textbox.
resources/views/autocomplete.blade.php
This is last step of our tutrial and here we want to set route of AutocompleteController.php index() and fetch() method. For this we have to go to routes/web.php and write following code for set route for this two method.
routes/web.php
This is complete step by step process for implement Ajax Autocomplete textbox feature in Laravel Application using JQuery with Mysql database. If you have query regarding this tutorial, please comment in comment box.

Step 1 : Create table in Mysql
First we have to make apps_countries table in our mysql database. We will fetch country data from this table and display in autocomplete country list below textbox.
--
-- Database: `testing`
--

-- --------------------------------------------------------

--
-- Table structure for table `apps_countries`
--

CREATE TABLE `apps_countries` (
  `id` int(11) NOT NULL,
  `country_code` varchar(2) NOT NULL DEFAULT '',
  `country_name` varchar(100) NOT NULL DEFAULT ''
) ENGINE=MyISAM DEFAULT CHARSET=utf8;

--
-- Dumping data for table `apps_countries`
--

INSERT INTO `apps_countries` (`id`, `country_code`, `country_name`) VALUES
(1, 'AF', 'Afghanistan'),
(2, 'AL', 'Albania'),
(3, 'DZ', 'Algeria'),
(4, 'DS', 'American Samoa'),
(5, 'AD', 'Andorra'),
(6, 'AO', 'Angola'),
(7, 'AI', 'Anguilla'),
(8, 'AQ', 'Antarctica'),
(9, 'AG', 'Antigua and Barbuda'),
(10, 'AR', 'Argentina'),
(11, 'AM', 'Armenia'),
(12, 'AW', 'Aruba'),
(13, 'AU', 'Australia'),
(14, 'AT', 'Austria'),
(15, 'AZ', 'Azerbaijan'),
(16, 'BS', 'Bahamas'),
(17, 'BH', 'Bahrain'),
(18, 'BD', 'Bangladesh'),
(19, 'BB', 'Barbados'),
(20, 'BY', 'Belarus'),
(21, 'BE', 'Belgium'),
(22, 'BZ', 'Belize'),
(23, 'BJ', 'Benin'),
(24, 'BM', 'Bermuda'),
(25, 'BT', 'Bhutan'),
(26, 'BO', 'Bolivia'),
(27, 'BA', 'Bosnia and Herzegovina'),
(28, 'BW', 'Botswana'),
(29, 'BV', 'Bouvet Island'),
(30, 'BR', 'Brazil'),
(31, 'IO', 'British Indian Ocean Territory'),
(32, 'BN', 'Brunei Darussalam'),
(33, 'BG', 'Bulgaria'),
(34, 'BF', 'Burkina Faso'),
(35, 'BI', 'Burundi'),
(36, 'KH', 'Cambodia'),
(37, 'CM', 'Cameroon'),
(38, 'CA', 'Canada'),
(39, 'CV', 'Cape Verde'),
(40, 'KY', 'Cayman Islands'),
(41, 'CF', 'Central African Republic'),
(42, 'TD', 'Chad'),
(43, 'CL', 'Chile'),
(44, 'CN', 'China'),
(45, 'CX', 'Christmas Island'),
(46, 'CC', 'Cocos (Keeling) Islands'),
(47, 'CO', 'Colombia'),
(48, 'KM', 'Comoros'),
(49, 'CG', 'Congo'),
(50, 'CK', 'Cook Islands'),
(51, 'CR', 'Costa Rica'),
(52, 'HR', 'Croatia (Hrvatska)'),
(53, 'CU', 'Cuba'),
(54, 'CY', 'Cyprus'),
(55, 'CZ', 'Czech Republic'),
(56, 'DK', 'Denmark'),
(57, 'DJ', 'Djibouti'),
(58, 'DM', 'Dominica'),
(59, 'DO', 'Dominican Republic'),
(60, 'TP', 'East Timor'),
(61, 'EC', 'Ecuador'),
(62, 'EG', 'Egypt'),
(63, 'SV', 'El Salvador'),
(64, 'GQ', 'Equatorial Guinea'),
(65, 'ER', 'Eritrea'),
(66, 'EE', 'Estonia'),
(67, 'ET', 'Ethiopia'),
(68, 'FK', 'Falkland Islands (Malvinas)'),
(69, 'FO', 'Faroe Islands'),
(70, 'FJ', 'Fiji'),
(71, 'FI', 'Finland'),
(72, 'FR', 'France'),
(73, 'FX', 'France, Metropolitan'),
(74, 'GF', 'French Guiana'),
(75, 'PF', 'French Polynesia'),
(76, 'TF', 'French Southern Territories'),
(77, 'GA', 'Gabon'),
(78, 'GM', 'Gambia'),
(79, 'GE', 'Georgia'),
(80, 'DE', 'Germany'),
(81, 'GH', 'Ghana'),
(82, 'GI', 'Gibraltar'),
(83, 'GK', 'Guernsey'),
(84, 'GR', 'Greece'),
(85, 'GL', 'Greenland'),
(86, 'GD', 'Grenada'),
(87, 'GP', 'Guadeloupe'),
(88, 'GU', 'Guam'),
(89, 'GT', 'Guatemala'),
(90, 'GN', 'Guinea'),
(91, 'GW', 'Guinea-Bissau'),
(92, 'GY', 'Guyana'),
(93, 'HT', 'Haiti'),
(94, 'HM', 'Heard and Mc Donald Islands'),
(95, 'HN', 'Honduras'),
(96, 'HK', 'Hong Kong'),
(97, 'HU', 'Hungary'),
(98, 'IS', 'Iceland'),
(99, 'IN', 'India'),
(100, 'IM', 'Isle of Man'),
(101, 'ID', 'Indonesia'),
(102, 'IR', 'Iran (Islamic Republic of)'),
(103, 'IQ', 'Iraq'),
(104, 'IE', 'Ireland'),
(105, 'IL', 'Israel'),
(106, 'IT', 'Italy'),
(107, 'CI', 'Ivory Coast'),
(108, 'JE', 'Jersey'),
(109, 'JM', 'Jamaica'),
(110, 'JP', 'Japan'),
(111, 'JO', 'Jordan'),
(112, 'KZ', 'Kazakhstan'),
(113, 'KE', 'Kenya'),
(114, 'KI', 'Kiribati'),
(115, 'KP', 'Korea, Democratic People\'s Republic of'),
(116, 'KR', 'Korea, Republic of'),
(117, 'XK', 'Kosovo'),
(118, 'KW', 'Kuwait'),
(119, 'KG', 'Kyrgyzstan'),
(120, 'LA', 'Lao People\'s Democratic Republic'),
(121, 'LV', 'Latvia'),
(122, 'LB', 'Lebanon'),
(123, 'LS', 'Lesotho'),
(124, 'LR', 'Liberia'),
(125, 'LY', 'Libyan Arab Jamahiriya'),
(126, 'LI', 'Liechtenstein'),
(127, 'LT', 'Lithuania'),
(128, 'LU', 'Luxembourg'),
(129, 'MO', 'Macau'),
(130, 'MK', 'Macedonia'),
(131, 'MG', 'Madagascar'),
(132, 'MW', 'Malawi'),
(133, 'MY', 'Malaysia'),
(134, 'MV', 'Maldives'),
(135, 'ML', 'Mali'),
(136, 'MT', 'Malta'),
(137, 'MH', 'Marshall Islands'),
(138, 'MQ', 'Martinique'),
(139, 'MR', 'Mauritania'),
(140, 'MU', 'Mauritius'),
(141, 'TY', 'Mayotte'),
(142, 'MX', 'Mexico'),
(143, 'FM', 'Micronesia, Federated States of'),
(144, 'MD', 'Moldova, Republic of'),
(145, 'MC', 'Monaco'),
(146, 'MN', 'Mongolia'),
(147, 'ME', 'Montenegro'),
(148, 'MS', 'Montserrat'),
(149, 'MA', 'Morocco'),
(150, 'MZ', 'Mozambique'),
(151, 'MM', 'Myanmar'),
(152, 'NA', 'Namibia'),
(153, 'NR', 'Nauru'),
(154, 'NP', 'Nepal'),
(155, 'NL', 'Netherlands'),
(156, 'AN', 'Netherlands Antilles'),
(157, 'NC', 'New Caledonia'),
(158, 'NZ', 'New Zealand'),
(159, 'NI', 'Nicaragua'),
(160, 'NE', 'Niger'),
(161, 'NG', 'Nigeria'),
(162, 'NU', 'Niue'),
(163, 'NF', 'Norfolk Island'),
(164, 'MP', 'Northern Mariana Islands'),
(165, 'NO', 'Norway'),
(166, 'OM', 'Oman'),
(167, 'PK', 'Pakistan'),
(168, 'PW', 'Palau'),
(169, 'PS', 'Palestine'),
(170, 'PA', 'Panama'),
(171, 'PG', 'Papua New Guinea'),
(172, 'PY', 'Paraguay'),
(173, 'PE', 'Peru'),
(174, 'PH', 'Philippines'),
(175, 'PN', 'Pitcairn'),
(176, 'PL', 'Poland'),
(177, 'PT', 'Portugal'),
(178, 'PR', 'Puerto Rico'),
(179, 'QA', 'Qatar'),
(180, 'RE', 'Reunion'),
(181, 'RO', 'Romania'),
(182, 'RU', 'Russian Federation'),
(183, 'RW', 'Rwanda'),
(184, 'KN', 'Saint Kitts and Nevis'),
(185, 'LC', 'Saint Lucia'),
(186, 'VC', 'Saint Vincent and the Grenadines'),
(187, 'WS', 'Samoa'),
(188, 'SM', 'San Marino'),
(189, 'ST', 'Sao Tome and Principe'),
(190, 'SA', 'Saudi Arabia'),
(191, 'SN', 'Senegal'),
(192, 'RS', 'Serbia'),
(193, 'SC', 'Seychelles'),
(194, 'SL', 'Sierra Leone'),
(195, 'SG', 'Singapore'),
(196, 'SK', 'Slovakia'),
(197, 'SI', 'Slovenia'),
(198, 'SB', 'Solomon Islands'),
(199, 'SO', 'Somalia'),
(200, 'ZA', 'South Africa'),
(201, 'GS', 'South Georgia South Sandwich Islands'),
(202, 'ES', 'Spain'),
(203, 'LK', 'Sri Lanka'),
(204, 'SH', 'St. Helena'),
(205, 'PM', 'St. Pierre and Miquelon'),
(206, 'SD', 'Sudan'),
(207, 'SR', 'Suriname'),
(208, 'SJ', 'Svalbard and Jan Mayen Islands'),
(209, 'SZ', 'Swaziland'),
(210, 'SE', 'Sweden'),
(211, 'CH', 'Switzerland'),
(212, 'SY', 'Syrian Arab Republic'),
(213, 'TW', 'Taiwan'),
(214, 'TJ', 'Tajikistan'),
(215, 'TZ', 'Tanzania, United Republic of'),
(216, 'TH', 'Thailand'),
(217, 'TG', 'Togo'),
(218, 'TK', 'Tokelau'),
(219, 'TO', 'Tonga'),
(220, 'TT', 'Trinidad and Tobago'),
(221, 'TN', 'Tunisia'),
(222, 'TR', 'Turkey'),
(223, 'TM', 'Turkmenistan'),
(224, 'TC', 'Turks and Caicos Islands'),
(225, 'TV', 'Tuvalu'),
(226, 'UG', 'Uganda'),
(227, 'UA', 'Ukraine'),
(228, 'AE', 'United Arab Emirates'),
(229, 'GB', 'United Kingdom'),
(230, 'US', 'United States'),
(231, 'UM', 'United States minor outlying islands'),
(232, 'UY', 'Uruguay'),
(233, 'UZ', 'Uzbekistan'),
(234, 'VU', 'Vanuatu'),
(235, 'VA', 'Vatican City State'),
(236, 'VE', 'Venezuela'),
(237, 'VN', 'Vietnam'),
(238, 'VG', 'Virgin Islands (British)'),
(239, 'VI', 'Virgin Islands (U.S.)'),
(240, 'WF', 'Wallis and Futuna Islands'),
(241, 'EH', 'Western Sahara'),
(242, 'YE', 'Yemen'),
(243, 'ZR', 'Zaire'),
(244, 'ZM', 'Zambia'),
(245, 'ZW', 'Zimbabwe');

--
-- Indexes for dumped tables
--

--
-- Indexes for table `apps_countries`
--
ALTER TABLE `apps_countries`
  ADD PRIMARY KEY (`id`);

--
-- AUTO_INCREMENT for dumped tables
--

--
-- AUTO_INCREMENT for table `apps_countries`
--
ALTER TABLE `apps_countries`
  MODIFY `id` int(11) NOT NULL AUTO_INCREMENT, AUTO_INCREMENT=246;
Step 2: Crate Controller
After this we want to make one Autocomplete controller for handle http request for Autocomplete textbox. For this we have to write this following command in command prompt.
php artisan make:controller AutocompleteController
Above command will make AutocompleteController.php file in app/Http/Controllers folder. In this file we will write following code. First index() method will html output on web page and dislay textbox for enter country name. When we have enter country name then it will send request to fetch() method for search country name from mysql table.
app/Http/Controllers/AutocompleteController.php
<?php

namespace App\Http\Controllers;

use Illuminate\Http\Request;
use DB;

class AutocompleteController extends Controller
{
    //for create controller - php artisan make:controller AutocompleteController

    function index()
    {
     return view('autocomplete');
    }

    function fetch(Request $request)
    {
     if($request->get('query'))
     {
      $query = $request->get('query');
      $data = DB::table('apps_countries')
        ->where('country_name', 'LIKE', "%{$query}%")
        ->get();
      $output = '<ul class="dropdown-menu" style="display:block; position:relative">';
      foreach($data as $row)
      {
       $output .= '
       <li><a href="#">'.$row->country_name.'</a></li>
       ';
      }
      $output .= '</ul>';
      echo $output;
     }
    }

}
Step 3: Crate View File
Now we want to make view file with name autocomplete.blade.php in resources/view/ folder. This is our output file and we can see output in browser. In this file we have write html code for display textbox for enter country name and jquery code for send ajax request to Laravel Autocomplete controller fetch() method. After fetching data from server it will display list of suggested country below textbox.
resources/views/autocomplete.blade.php
<!DOCTYPE html>
<html>
 <head>
  <title>Ajax Autocomplete Textbox in Laravel using JQuery</title>
  <script src="https://ajax.googleapis.com/ajax/libs/jquery/3.1.0/jquery.min.js"></script>
  <link rel="stylesheet" href="https://maxcdn.bootstrapcdn.com/bootstrap/3.3.6/css/bootstrap.min.css" />
  <script src="https://maxcdn.bootstrapcdn.com/bootstrap/3.3.7/js/bootstrap.min.js"></script>
  <style type="text/css">
   .box{
    width:600px;
    margin:0 auto;
   }
  </style>
 </head>
 <body>
  <br />
  <div class="container box">
   <h3 align="center">Ajax Autocomplete Textbox in Laravel using JQuery</h3><br />

   <div class="form-group">
    <input type="text" name="country_name" id="country_name" class="form-control input-lg" placeholder="Enter Country Name" />
    <div id="countryList">
    </div>
   </div>
     @csrf
  </div>
 </body>
</html>

<script>
$(document).ready(function(){

 $('#country_name').keyup(function(){
        var query = $(this).val();
        if(query != '')
        {
         var _token = $('input[name="_token"]').val();
         $.ajax({
          url:"{{ route('autocomplete.fetch') }}",
          method:"POST",
          data:{query:query, _token:_token},
          success:function(data){
           $('#countryList').fadeIn();
                    $('#countryList').html(data);
          }
         });
        }
    });

    $(document).on('click', 'li', function(){
        $('#country_name').val($(this).text());
        $('#countryList').fadeOut();
    });

});
</script>
Step 4: Set Route
This is last step of our tutrial and here we want to set route of AutocompleteController.php index() and fetch() method. For this we have to go to routes/web.php and write following code for set route for this two method.
routes/web.php
<?php


Route::get('/', function () {
    return view('welcome');
});

Route::get('/autocomplete', 'AutocompleteController@index');
Route::post('/autocomplete/fetch', 'AutocompleteController@fetch')->name('autocomplete.fetch');
This is complete step by step process for implement Ajax Autocomplete textbox feature in Laravel Application using JQuery with Mysql database. If you have query regarding this tutorial, please comment in comment box.